Date and time setup
Use desktop Chrome or Edge on the web flasher. Check that your computer's date, time and timezone are correct before installing.
- Select the exact board. Choose Update to preserve existing settings and user files.
- Leave automatic local-time setup checked, connect the matching USB device, and install.
- Keep USB connected. The installer closes automatically after successful flashing and starts clock setup on that same granted port. Wait for the date/time verification result before unplugging.
- If USB re-enumerates, click Finish clock setup, select that running device, and wait for verification. Failed setup is explicitly reported and can be retried without reflashing.
Connecting Detector tools also sets and verifies the computer's current time and timezone. Sync my local time repeats this at any time. With Keep my clock synchronized while connected checked, the flasher checks once a minute while the USB connection is idle, corrects drift or unset time, and updates the offset after travel or daylight-saving changes. Keep the page open and computer awake; a sleeping browser may delay checks. Uncheck this option to keep a custom manual time. Saving a manual time in the web page pauses automatic checks. Without a connected computer, UTC offsets are fixed; resync after travel or a daylight-saving change. Firmware uses UTC internally and the saved offset for the displayed date/time.
Set time and date on the device
On the four touch boards, open Settings → Time or tap the watch's settings icon. There are three tabs:
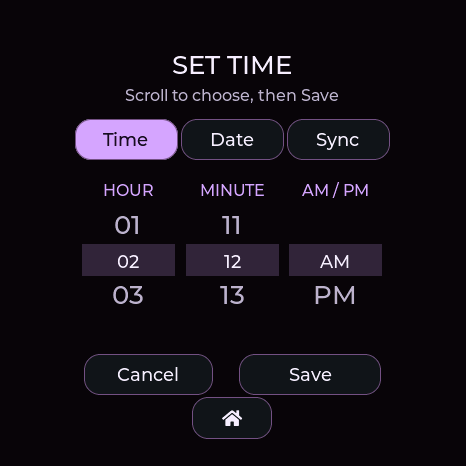
- Time: scroll the hour, minute and AM/PM wheels, then Save. Seconds start at zero and the current date is preserved.
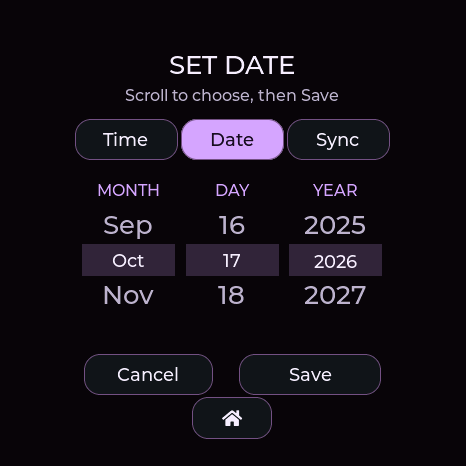
- Date: scroll month, day and year, then Save. The clock keeps ticking while you edit; saving the date preserves its current hours, minutes and seconds. February and shorter months automatically limit the day wheel.
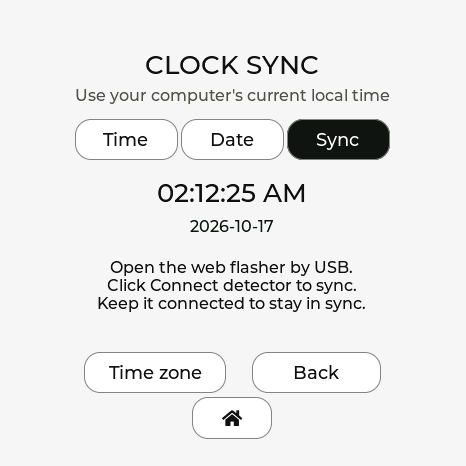
- Sync: see the current time/date and USB instructions. Time zone adjusts the local UTC offset in 15-minute steps without changing the underlying instant. USB synchronization sets the computer's current offset again.
If the clock is unset, confirm both Time and Date before saving; the first tab offers Next to take you to the other. Cancel/Home leaves the clock unchanged. After startup, an unset clock shows a themed Set your clock prompt. Set now opens these tabs; Later leaves the radar usable. Successful USB sync dismisses the prompt automatically.
All editors, detection notices, confirmations and error pop-ups use the selected theme, including light themes. Signal-family colors remain on the radar and its legend. Lite has no touchscreen settings tabs; use USB sync.
Actual AMOLED display captures from 0.13.11:
| Time · GhostStrats | Date · GhostStrats | Sync · DagNazty |
|---|---|---|
 |
 |
 |
No firmware can know how long an unpowered clock was off without an independent powered clock or an external time source. USB-only users can keep the device powered, or reconnect the web flasher / enter the current time and date after complete power loss. USB power from a charger alone does not supply the date/time.
Hardware clock versus powered system clock
| Device | Time source | After shutdown |
|---|---|---|
| M5Stack StopWatch C152 | RX8130CE hardware RTC | Keeps time while its backup supply is powered |
| Seeed XIAO + Round Display | BM8563 hardware RTC | Keeps time while its RTC battery/supply is powered |
| Waveshare AMOLED 1.75C | ESP32 system clock on tested hardware | USB sync or configured saved-Wi-Fi recovery required after full power-off |
| Spotpear | ESP32 system clock | USB sync or configured saved-Wi-Fi recovery required |
| Waveshare Lite | ESP32 system clock | USB sync required after full power-off |
The 1.75C schematic does not show the PCF85063 present on the non-C 1.75. The manufacturer introduction mentions an RTC, but its C schematic and direct I2C checks of the tested unit do not support promising a separate calendar RTC. The PMU's RTCLDO is only a supply output. Firmware still probes for an optional RTC; detected hardware is verified before any persistence claim.
In 0.13.10+, the flasher reads the hardware clock directly after setting it and checks again after 1.2 seconds to confirm that it advances. A missing RTC on StopWatch/XIAO, invalid/stale readback, or stopped oscillator fails setup. A correctly set software clock is reported separately with its power-off limitation. The firmware never restores an old saved timestamp and presents it as current time.
Powered software resets retain system time in 0.13.9+. Hardware reset/power cycling are different: without an independent powered RTC, elapsed off-time cannot be reconstructed offline. Keeping a software-clock board powered preserves time; complete battery discharge also loses it.
Optional recovery over saved Wi-Fi
All four full boards support saved-Wi-Fi clock recovery; Lite does not. Follow the network setup steps for any full board. The profile must be explicitly saved and selected for clock recovery. A network with Internet access is required. The firmware retries after a failed attempt; while offline after power loss it cannot know the current date/time. Wi-Fi secrets are entered on the flasher, not in chat.
Diagnostic commands
clock status reports the system time and local offset. clock hardware in 0.13.10+ reports a direct RTC read as CLOCK_HARDWARE detected=1 valid=1 epoch=... when available; a software-only board returns zeros. net time status reports the selected Wi-Fi recovery state. A valid system time alone does not prove a hardware RTC is present.
Clock and timer power saving
From 0.13.16, clock, timer, lap-history and time/date settings pause background Wi-Fi/Bluetooth scanning on all boards. USB time synchronization remains available. Previously configured Wi-Fi time recovery may briefly connect to set the clock, then disconnects without restarting detection while these screens remain open. See power-saving behavior.